Building a cat enclosure attached to an existing structure
 There are many options for this type of cat enclosure. The easiest solution can be to clad an existing pergola or patio with cat proof mesh, or fit a roof over a small-enclosed area such as a path between the house and fence.
If you do not have a suitable area then we have instructions on how to build a patio style enclosure from the ground up. There are also instructions for how to build a lightweight inexpensive alternative that can be constructed from galvanised water pipe and netting.
Read through the guide, examine your options, then go ahead and design your project to suit your needs.
Things to consider when building a cat enclosure
- Cats must have shelter from sun, wind and rain (however they still require access to sunshine in the enclosure).
- Cats must have a weatherproof sleeping compartment with a raised bed (which must be kept in a clean and hygienic condition), along with a separate exercise area.
- The litter tray area must be well away from the cat's eating and sleeping areas and must be kept dry and be easily cleaned. Litter trays must contain an appropriate litter material and be cleaned daily (many cats will not use soiled litter, and will therefore soil elsewhere in the enclosure).
- Accommodation should provide good ventilation, as this is vital to prevent build up of odours that can cause respiratory problems in cats.
- Hygiene and odour shouldn't be a problem as long as your cat uses its litter tray and the tray is cleaned regularly. However, in the event of your cat soiling the ground in the enclosure, you may have to consider adding some type of flooring. This could be as simple as installing small gauge wire mesh on the floor to prevent cats from digging and soiling in the dirt. Alternatively, you could install concrete or timber flooring that will also be easy to hose down.
- Cats require plenty of social contact with owners. This can be achieved by providing access to the house through a cat door (and tunnel if applicable).
- Each enclosure should have a scratching pole and be designed to provide cats with at least two platforms at different heights. The platforms should be connected by static planks or swinging walkways. Cats should also have access to climbing frames and an interesting visual outlook.
- In a group enclosure, a number of hiding and escape areas should be provided to enable cats to avoid aggression from other cats.
- The size of your enclosure will depend on the number of cats you wish to house, and how well they get on. The floor area of an enclosure must be at least 2m2 for each cat, with a minimum height of 2 metres, plus tunnels and auxiliary enclosures. These dimensions take into account cats having regular access to the house.
The first and most simple solution is to span an existing area, such as a section between the house and fence, a veranda, patio or courtyard, with a lightweight support system and cover it with netting.
If you are covering a small span, say between a wall and a fence to make a roof frame, take the measurements to your hardware supplier who can advise you on suitable materials and fixing components. Although this option doesn't involve building a full patio type structure, we recommend you still read through these instructions, and apply anything relevant to your project.
Instructions on building a cat enclosure
In the following section, we show you how to build two types of enclosures:
- Patio-type structure
- An alternative lightweight enclosure.
How to build a patio-type structure
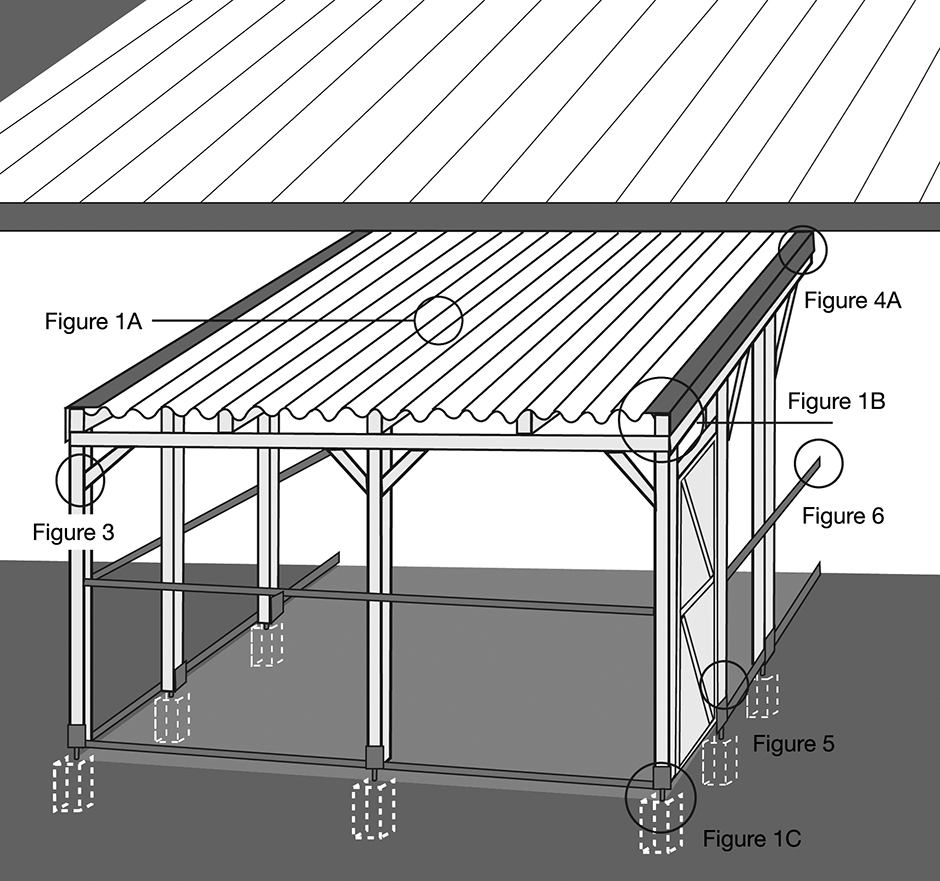
Patio type structure. This shows the basic building structure prior to the addition of solid weatherproof wall cladding on parts of the enclosure (to provide the cat with shelter) and prior to the addition of other features (platforms, climbing planks, scratching posts, beds, etc)
To span a wide area, consider building a typical patio structure.
The most common patio type structure involves rafters fixed to the house or garage, and supported at the other end by posts. The posts are connected along the top by a timber plate, which supports the rafters. The best way to set the posts into the ground is to bolt them in a galvanised stirrup set in a concrete footing.
Battens are then nailed across these rafters and the cladding fixed directly to the battens.
The basic structure is outlined in Figure 1.

Tools required
- drop saw
- handsaw
- spirit level
- drill
- string line
- shifting wrench
- hammer
- shovel
- eye protection
- tape measure
- hearing protection
- roofing square
- ladder
- Tec screw driver
- masonry or wood bits
Material checklist
Firstly, draw up a working sketch of your project and take it along to your local hardware supplier who will advise on the appropriate timber dimensions and spacings required for your particular application. Include this information in your drawing and check with your local council to see if a building permit is required.
Do not use treated pine in the structure as it may prove toxic to cats, especially if used as a scratching post. Typical timber dimensions and hardware requirements for an attached pergola approximately 4.8m × 3.6m.
Materials required
- 1 top plate, 200 × 50mm
- Framing brackets
- 3 posts 100 × 100mm
- 6 rafters 150 × 50mm
- 2 braces 75 × 50mm
- 3 post stirrups
- 2 rails 75 × 50mm
- concrete pre-mix
- 1 wall plate 150 × 38mm
- galvanised nails and bolts
- 3 joist hangers (attached to the wall plate as per photo)
- battens 45 × 22mm, (typically fitted at 450mm centres)
Construction
Step 1 — Set out
To set out the full size plan on the ground, place a string line parallel to the house along the outside edge of the patio. Now set 2 string lines at right angles to the house at each end of the enclosure. Check the set out is square by comparing corner-to-corner measurements, ensuring that they are equal. See Figure 2.

Allow spacing of 3 metres or less between posts and mark their position along the outer string line. Walk around your set out to check dimensions and proportions.
Step 2 — Setting the stirrup post supports
Dig 200 × 200mm holes to a depth of 300mm for each post. See Figure 1C. Prepare the premixed concrete and fill the holes. Push the post supports into the concrete ensuring that the stirrup is above the ground level. This will allow water to drain away from the bottom of the posts and prevent rot. Align each post support to the string line ensuring that they are all level and square.
Leave the concrete to cure to specification. Drill and bolt the posts in position and secure each post upright with temporary bracing. House (check in) and bolt the 200 × 50mm timber plate in position across the length of the posts and brace the end posts to the top plate with 150 × 50mm bracing bolted at 45 degrees. See Figure 3.

Please Note: If you are fixing the posts onto an existing slab, use post supports with a flat plate on the bottom. These are bolted in position with expanding masonry plugs. Your local hardware attendant can show you this method.
 flange support (right)") Step 3 — Attaching a pergola to the house and fixing rafters
Step 3 — Attaching a pergola to the house and fixing rafters
First fit a wall plate to the house, this wall plate is fixed to the wall of a brick house under the eaves with masonry plugs, or to a timber house with coach bolts screwed through the weatherboards and into the frame. The rafters are then fixed to the wall plate with joist hangers, and span across to the top plate at approximately 600mm intervals or less and fix with framing brackets or skew nails.
Step 4 — Fixing battens
Battens are evenly spaced across the rafters at approximately 900mm intervals or less and nailed in position with galvanised nails. Battens should be predrilled to avoid the timber splitting.
Step 5 — Access door
The door is a simple brace and rail construction made from hardwood bolted together with galvanised bolts and clad with mesh. The door is hung between two vertical posts with a header bolted across at door height. If there are any children around then consider a childproof latch on the external door. See Figure 5.

Step 6 — Finishing the timber structure
Remember that treated pine is not an option so you will need to seal the timber to protect it from weathering with a good quality exterior finish. Paint the internal faces of the joints before assembly.
Step 7 — Roofing/weather proof cladding
Note that in some cases it may be a legal requirement that a licensed plumber is required to fit the roofing and flashing (contact your local water supplier for details).
Corrugated steel products
Zincalume and Colourbond sheeting can be used for roof and partial wall cladding. If you live by the coast then specify corrosion resistant steel sheeting. These products are easily fixed, however the structure must be sound. They are weatherproof and permanent but do restrict natural light, which is a consideration when enclosing an external wall containing windows. In this situation, clear polycarbonate sheeting such as Laserlight and Suntuff is an ideal solution.
There are a wide range of grades available, which have differing light and heat transmission characteristics. Each product comes with specific fixing instructions, which must be followed. Remember that some part of the enclosure must provide cats with access to sunshine, while other areas must give shelter from the sun.
If you are likely to climb on polycarbonate roof cladding, you may wish to install a safety barrier directly underneath the material to prevent accidental falls. Ask your supplier to recommend a light wire mesh that can be fixed on top of the battens. The sheeting and end flashing is then fixed to the battens with self-tapping Tec screws and rubber washers.
You may want to consider installing guttering and a downpipe, if excess water run-off from the enclosure roof is a problem. The gutter should be fixed just below the line of the roofing, across the outside of the end beam. Remember to allow for a second fall, so rainwater can run along a slight slope in the gutter and flow into the downpipe.
The pipe needs to be attached to the nearest stormwater outlet. Seek advice from your local hardware store, or contact a qualified plumber for assistance installing a gutter and downpipe.
Step 8 — Wall cladding options
Galvanised welded mesh is rustproof and available in a wide range of sizes and gauges. The maximum mesh size recommended for cat enclosures is 50 × 50 mm. A well-fixed 4-gauge mesh will provide reasonable security for your enclosure and is strong enough to support climbing plants if you add them. Metal mesh is fixed to the timber posts and timber rails with staples or washers and Tec screws depending on mesh sizes and loading. See Figure 6.

Light flexible mesh is held in position with a timber batten nailed to posts or your existing structure (house or fence). Ask your mesh supplier to advise on the optimum fixing method for your application.
Lightweight 25 × 25 mm mesh makes a good barrier where security is not a consideration. The mesh can be fixed with washers and Tec screws.
Galvanised chicken wire is a cheap alternative and is fixed with battens anchored to the base structure.
Shade cloth is available in a wide range of colours and opacities making it a good option for your enclosure. It has good UV stability and will last for years, however it should be checked occasionally for signs of weakness. It is fixed to the structure with special fasteners that are available from your shade cloth supplier.
Shadecloth walls are prone to damage from climbing cats and can be strengthened with metal mesh.
Insect screening can be incorporated into the structure but it needs to be supported by a stronger mesh.
Commercial netting products — any netting is suitable if it is:
- strong
- UV stable
- rot resistant
Access doors can be sewn in with a zip fastener. See supplier list, at the end of this guide.
Please Note: If netting is to be used to clad the enclosure then a wooden board needs to be set into the ground around the perimeter of the enclosure.
How to build an alternative lightweight enclosure

This enclosure is a lightweight alternative to the patio structure and is intended to be covered with flexible netting that has a sewn in door.
The structure will not support a roof and is unsuitable for other mesh cladding. This type of lightweight enclosure is only suitable if the cat has constant access to the owner's house through a cat door, so it can seek shelter during inclement weather.
The frame is made from round galvanised steel tubing that is bent at an angle, fixed to the wall at the top, and set in concrete pads in the ground at the other end. See Figure 7.

To provide lateral support, the structure will need to be cross-braced or fixed to something solid, for example a fence.
The recommended wall fitting is a metal flange that is threaded onto the pipe and fixed to the structure by means of coach bolts or masonry plugs.
The other end of the pipe is set into a concrete footing. Bracing is attached with prefab pipefittings that are readily available from your supplier.
The structure can be covered with a prefabricated flexible netting cover with a sewn in zippered entrance.
Tools required
- shovel
- spirit level
- drill
- roofing square
- masonry or wood bits
- shifting spanner
Materials required
- galvanised pipe
- prefab pipe fitting
- screw on flanges
- flexible netting cover
- coach bolts or masonry plugs
- tie wire
- concrete pre-mix
Step 1 — Basic design and pre-fabrication
Draw the basic plan and discuss it with your steel supplier who can recommend the best pipe diameter, usually around 50mm. Have the pipe cut to length and bent.
Based on your design identify pipes that need to be threaded on the top end to suit the screw-on flanges for fixing and have them threaded at the time of purchase.
Most suppliers have a delivery service for hard to handle components.
Step 2 — Set out
Start construction with a string line parallel to the supporting wall at the outside perimeter and another 2 string lines at right angles to the wall marking each end. See Figure 2.
Step 3 — Setting the frame posts
- Dig the footings and erect the structure ensuring that it is well braced. Take a spirit level and sight all pipes from all angles to make sure they are in alignment with each other and in alignment with the support structure. Take care with this stage, as a poorly aligned frame can look shoddy.
- Fit the bracing to square the frame and level the top bars by packing the bottom of the pipes with small rocks in the footing holes.
- When you are happy that everything is straight and square, mix up a quantity of premix cement and pour the footings. Allow to set to specification.
- Set a wooden board into the ground all around the perimeter. The prefabricated netting cover will be fastened to this board.
- Measure the finished project for the prefabricated netting.
Step 4 — Fixing the netting
The netting is tied to the frame with galvanised tie wire. It is fixed to wood and masonry with battens, the same as for patio structure.