Raising queen honey bees
Beekeepers often find that some honey bee colonies produce more honey than others. This can happen even though the colonies are all in the one apiary with the same conditions and types of flora. Often these production differences are a result of variations in the strain of bee and the quality of the queen in the individual colonies.
Beekeepers can change the strain (or type) of bee in a colony, by removing the queen and replacing her with a queen of the desired strain. This procedure is known as requeening a colony. Requeening is also used to replace queens that are old or have reduced egg laying capacity.
Laying queens may be bought from a queen breeder, or they may be reared by a beekeeper who has a good understanding of bee behaviour, bee handling and beekeeping.
People inexperienced in handling bees should read Safe beekeeping practices first. It is essential that adequate protective clothing, including a bee veil, is worn. Techniques for safe handling of bees should be understood before opening hives.
Natural queen raising by honey bees
Queens are raised from the same fertilised female eggs as workers bees. A newly hatched female larva is neither queen or worker caste. There are small differences in the composition of royal jelly fed to larvae destined to be a queen or a worker. The variation in diet starts from the time of larvae hatching. On the third day after hatching, a major difference in diet occurs when pollen is included in the diet of female larvae destined to become a worker.
It is important to use larvae under the age of 24 hours when rearing queens. Larvae of this age will have had minimal exposure to a worker diet.
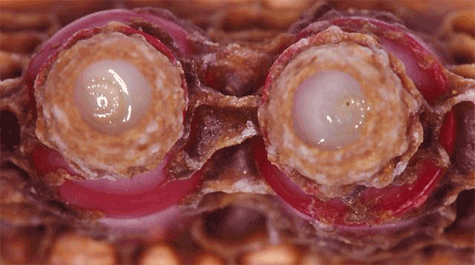
Queens are raised by honey bee colonies in specially built queen cells. These are near vertical, peanut-shaped beeswax cells with an opening that faces downwards. Queen cells may be found on the edges and surface of the comb. They are only built when required and are not always present in the hive.
The base of the queen cell is known as the 'cell cup'. During natural queen raising, the queen may lay an egg in the cup before the walls of the cell are fully built by the worker bees. (The laying of eggs in cell cups does not apply when bees raise queens under the emergency impulse.)
The following natural impulses stimulate the building of queen cells and raising of queens.
Queenlessness (emergency)
When a colony loses its queen, an emergency exists. The bees raise new queens as quickly as possible.
Worker cells (sometimes many) containing larvae are modified to become queen cells. These larvae may be fed worker royal jelly for some time, so the queen raised may have a reduced egg laying capacity.
Swarming (reproduction) and supersedure (replacement)
When swarming is to begin, eggs are laid in queen cell cups built by the bees on the surface or edge of the comb. The situation is similar in the case of supersedure where the colony raises only a small number of queens to replace an old or deteriorating queen.
Queens raised under these 2 natural impulses are usually well developed with good egg laying potential. As the larvae are destined to become queens, they are fed the appropriate diet for queen larvae from the time of hatching. In addition, because a queen is present in the colony, they are raised in an unhurried manner.
The supersedure impulse can be triggered within the hive by the beekeeper to raise large numbers of quality queens in a well controlled manner.
Requirements to obtain good queens
Successful raising of queens requires:
- ample supply of nectar and good quality pollens
- an abundance of sexually mature, high-quality drones for mating with the newly emerged virgin queens
- suitable weather for mating of drones and queens
- suitable starter and cell raising colonies (described later)
- a queen mother to breed from, whose offspring worker bees (and colonies) display ideal characteristics such as gentle temperament, disease resistance, low swarming tendency and excellent honey production
The detailed subjects of genetics and selection of suitable drone and queen mothers for breeding bees (in comparison to raising queens) is outside the scope of this page. The books listed under 'Further reading' provide useful information on these subjects.
Summary of steps for queen raising
Queen raising involves the following stages:
- establishing a starter colony for initial stage of raising queen cells
- establishing the cell building colony
- grafting honey bee larvae
- transferring the mature queen cells to honey bee nucleus colonies for the mating stage
The starter colony
Choose a strong, 2-storey colony that is preferably headed by a 2 year old queen. Relocate the queen and the comb she is on (with bees), to a spare empty 8-frame box or nucleus hive. Move the 2-storey hive about 2 metres behind the original site.
Prepare the starter colony by placing an empty box with bottom board and lid on the now vacant site. Transfer 4 combs of unsealed brood with adult bees from the 2-storey hive to the empty box.
Place a comb of unsealed honey and pollen with bees on each side of the brood. Place empty combs in the box to fill the gaps.
Add extra young bees into the starter colony by shaking bees from another 2 or 3 combs (preferably brood combs) of the 2-storey hive.
Add a feeder of sugar syrup to the starter. The state of queenlessness will stimulate the nurse bees in the starter colony to feed and produce more brood food.
Return the queen and the comb she is on to the bottom box of the 2-storey hive.
The cell builder colony
The aim of this procedure is to trigger the supersedure impulse — under which bees will carefully nurture the young, developing queens.
When selecting cell builder colonies, avoid those headed with very young queens. Choose strong colonies that fully occupy at least double storey hives. An average 3-box colony can be temporarily reduced to 2 boxes of space.
With an excluder, confine the queen to the bottom box. This brood chamber should contain a balanced amount of brood and empty drawn comb for the queen to lay eggs.
Place 2 combs of very young larvae in the centre of the super. Fill out the remaining space with combs of honey and pollen.
Make sure that combs of unsealed honey and pollen are placed alongside the frames of unsealed larvae. This will simulate a natural brood nest.
The excluder will prevent the queen from occupying the super. Nurse bees will be recruited to feed the unsealed larvae in the super.
It is a good idea to lift the unsealed brood into the super with the nurse bees adhering to the comb. Quite soon, the bees in the super will recognise the new brood nest is not being occupied by their queen and begin to respond to the natural supersedure impulse. It is in this environment that freshly grafted or started cells can be introduced for rearing.
Leave a gap between the two brood combs in the super just wide enough to take the cell bar (see grafting section).
Later, when inserting the cell bar of freshly grafted larvae (or started queen cells of the next stage), lower it very gently through the clustered bees.
Avoid rearing queens during a heavy honey flow. A light nectar flow and copious pollen (preferably a mixture of pollens) provide the best field conditions.
Leave the cell building colony for at least 24 hours before inserting started or freshly grafted cells.
If at any time, supplementary feeding of the cell building colony becomes necessary, always use sugar syrup to simulate nectar — never use diluted honey.
Grafting
 Prepare the bars of cells by sticking 20 plastic cell cups to a waxed bottom bar of a half-depth frame or a home made wooden cell bar (see photo).
Place the bar in a hive at least 24 hours before grafting so the bees can clean and condition the cell cups.
A grafting tool is used to transfer larvae — each floating on its little raft of jelly, undisturbed onto the bottom of the cell cup (see diagram).
The grafting tool must follow the curve of the bottom of the cell, so it can be inserted under the back of the tiny floating larvae without touching it. Under optimum grafting conditions, of cool temperature and well fed larvae, the priming of cell cups beforehand with diluted royal jelly should not be necessary — particularly for modest numbers of cells.
Avoid grafting in very hot weather or periods of low humidity as the larvae may be damaged by dehydration. Grafting in the very early morning may help to avoid these conditions while temperatures are still relatively cool.
Only graft larvae that are under 24 hours of age from hatching and are floating on a good amount of royal jelly. Grafting may be done indoors under good artificial light, or in the open, if atmospheric conditions are suitable. Don't expose larvae to direct sunlight and work as quickly as possible.
When ready to graft, remove the frame of larvae from the breeder colony. Carefully brush the bees from it and carry it to the grafting location.
Place or lean the frame in a position where the light falls into the cells (avoiding direct sunlight) and where it is convenient to remove the larvae without discomfort.
Shaving the cells down to about half depth can help. Use a safety razor with the rake removed. Dip the razor in hot water to heat it. The hot blade will slice the tops off the cells quickly and cleanly.
The transfer of larvae to the prepared cell cups can then be performed.
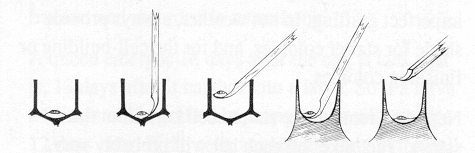 The grafting process:
- Larva floating on royal jelly
- The grafting tool in the vertical position close to the worker cell wall is slid under the floating larva
- The larva is lifted out
- The larva is placed into the queen cell by drawing the tool across the cell base
- Grafting is completed.
Just before grafting takes place, remove the combs of brood in the starter hive. Shake the adhering bees back into the starter hive. Return the brood combs to the super of the 2-storey hive.
As soon as grafting is completed, insert the bar of cells in the starter colony, avoiding dehydration of the larvae. The bar of cells is to remain there until the next morning. Do not overload the starter colony, 4 bars of cells are quite sufficient.
By now, the starter hive has plenty of nurse bees, plenty of stores, and plenty of honey and pollen coming in with the field bees. It is queenless, strongly motivated by the emergency impulse, and has nothing to feed or look after except the bars of freshly grafted larvae.
This method of starting cells should not fail unless there is:
- outside interference from animals or people
- excessive temperatures
- imperfect grafting.
In hot weather, always provide shade for starter colonies and the cell building colonies.
On the morning of day 1 after grafting, remove the bars of cells from the starter hive. The 'take' (acceptance of cells) on each bar will vary, depending on the care and skill of the operator.
The best queens are obtained by culling these cells down to no more than 15 cells per bar. Cull any cells whose larvae look a bit bigger than the others and any that do not seem to be well fed.
Carefully open the cell builder hive and make a space between the 2 combs of brood in the super.
Place each bar of started cells with adhering bees in this space — be careful not to shake or knock the bar. Replace and refill the feeder. Continue light feeding until the time the cells are sealed (for 4 days after the cell bars were inserted).
Other bars of cells may now be grafted and given to the starter colony. The starter may be re-assembled in its original form if it is not needed to start more cells.
Many experienced queen breeders are able to dispense with the starting colony procedure. They are confident enough in their manipulative and grafting ability to transfer freshly grafted material directly into the cell building colony and obtain successful acceptance percentages.
Records and emergence of the queens
Keep a record of the day the cells were grafted and the day the queens are due to emerge.
This may be done by a system of marks on hives, bars and frames, and recorded in a notebook. A queen emerges 16 days after the egg was laid, or 13 days after the egg hatches into a larva. If a larva 24 hours old is grafted, a young queen will emerge 12 days later. If cells are left too long in the cell-building colony and a young queen emerges — she will destroy all the other cells.
Ideally, cells are best left until the day before they are due to emerge before being taken from the cell building colony and distributed to nuclei.
However, this timing could be disastrous if one larva was older than the others and a virgin emerged before the cells were removed for distribution to nuclei. Cells may safely be given to nuclei on day 12 after the egg was first laid, or even earlier if handled very carefully.
Transport and distributing the cells
Cells must be handled gently to prevent damage to the immature queens. Give them a smooth ride to the mating yard. Never shake or jar combs or bars with cells. As much as possible, avoid turning cells from their natural perpendicular position.
Avoid exposure to hot, direct sunlight. The queen nymph is susceptible to chill. Don't leave the cells out of the hives for any length of time and avoid exposure to cold winds or a chilly atmosphere.
When transporting, several bars of cells may be placed into the one cell-carrying hive. This hive may simply be a hive used for cell building or a nucleus box moderately filled with bees from a cell builder hive — but without a queen. The cell-carrying hive must not be crowded with too many bees as this can cause the cells to overheat.
Cells should be put out as soon as possible after the nucleus colonies are set up in the mating yard. If too much time is allowed to elapse, the nuclei will commence building cells of their own. It is essential to destroy all these cells before inserting the raised cells into the nuclei. In addition, the adult bees may also become discontented and inclined to drift. In hot weather, wait until the cool of the evening before distributing the cells.
One cell only is given to a nucleus. A wet sharp knife is used to separate adjoining cells on the cell bar. Stand the top bar of the frame holding the bar(s) of cells uppermost.
Each cell may be carefully prised from the bar and placed straight into a nucleus hive. A side comb is first removed from the nucleus to allow room for manipulation. A slight depression is pressed into the face of the centre brood comb and the plastic base of the cell gently pressed into it.
Each nucleus should be marked with a record of the date the young queen is due to emerge and the queen from which she was bred.
Under normal field and mating conditions, a virgin queen will mate and commence to lay about 10 days after emerging from its cell. In the autumn, this period can extend considerably. Do not open nucleus hives or move them during during the mating period.
Mating of virgin queens
After virgin queens have been reared, it is equally important to have them mated properly. Mating takes place when queens are flying in the open — never in the hive.
A virgin queen will take one or more orientation flights to mark the location of the hive a few days after she emerges from the cell. Mating takes place when virgins are sexually mature — at 5 to 6 days of age after emergence.
If confined to the hive for more than 20 days due to unfavourable weather or wing damage, or if they are unable to mate successfully —the queens will remain infertile and become drone layers.
Most queen rearers will destroy all queens that fail to lay on time, except in the autumn when mating and expected laying time can be extended because of cooler temperatures.
Further reading
- The hive and the honey bee (1992). Edited by J Graham. Published by Dadant and Sons, Hamilton, Illinois, USA.
- Queen rearing (1962). By H Laidlaw and J Eckert. University Press, Berkly, California, USA.
- Queen rearing (1981). By L Snelgrove. Published by Snelgrove and Smith, Avon, UK.
Acknowledgement
These notes have been adapted from the chapter 'Queen raising and requeening' from the now out of print book 'Beekeeping'. The chapter was authored by John McMonigle, former apiary inspector. Linton Briggs, queen rearer, Glenrowan, Victoria, supplied Figure 1 and contributed to the original text of the above chapter and this page.