Sampling soils for soil testing
The usefulness of soil analysis depends on representative samples being supplied to laboratories. Soil properties can vary — even in small areas and paddocks that look like they are uniform. The standard sampling procedures outlined below are designed to minimise the effects of soil variation and help you collect a representative sample.
Sampling soils used for growing pastures, field and fodder crops
Soils are generally sampled by driving a sampling tube into the soil, usually to 10cm depth, and extracting a soil core. To obtain a representative sample, soil cores are combined from a large number of places within the sample area. The more cores that are combined, the more representative the final sample is and more accurate advice can be given.
Soil testing is a really important decision-making tool. We use it to determine soil nutrient levels and other soil characteristics. The tools you will need are a soil corer, a clean plastic bucket, a plastic bag to put your samples in and a tray to do your subsampling.
An aerial photo or mud map will assist with the planning of that soil sampling. The other really important factor is to make sure your soil corer is 10 centimetres and take the time to measure it. An aerial photo can be used in planning where to take your soil test.
Areas that we don't do are around water troughs, gateways, within four metres of a fence line and other clearly different areas within the paddock, so within this gully here, we are not going to take a sample...and also a stock camp at the top of the hill. Once we have determined that, it is very easy to work out where we are going to put our transect.
In this case we would look at a transect along there and also one back that way. That would give a truly representative soil sample of this paddock. I've got that end tree as my end point, as a transect, so that is what I'm heading towards.
This corer has an internal taper, so it always taps out backwards and you must make sure it is totally cleared before you take the next sample.
This is a 300 metre transect that I have got from the aerial map, so that means I need to take a sample every ten metres to get 30 samples.
We've got a urine patch and a cowpat there, so we're not going to test there. Instead we just move off to the side along the same transect and take a sample.
Once we have brought our 25 to 30 cores back, we put them in the bucket and need to mix them thoroughly. To do that we will pour them out into this tray and break up all of these cores. While we are doing this we remove any vegetation matter and rocks.
Once we are happy that we have sampled that and have got a really consistent mix throughout we are going to subsample. We break that in half and then we will break this section in half again. You want to end up with about 200 to 300 grams of soil to put in the bag. Once you've got that sample it is really important that you have got your name, your address, paddock name and the date you took the sample.
Samples should be placed in the laboratory-supplied bags for postage. The soil test results are going to come back to you in a range of different formats. Use your local agronomists, landcare groups or departmental staff to assist you with the interpretation. It's really important that we use this information to make informed decisions on what you are going to do with your soil and make sure that they align with your overall farm goals.
Depth of sampling
When sampling soils, it is important that the standard sampling depths are used. In the case of surface soil samples, this depth is 10cm. Shallower sampling will often result in higher values for chemical tests because the amount of nutrients is usually greater nearer the soil surface.
Sampling areas before planting a new pasture or crop
As soil nutrient levels can vary throughout the year, it is best to sample at the same time each year. Generally, pastures are soil sampled in the Spring, and for cropping in Autumn prior to sowing. When establishing a new pasture, or sowing a crop, it is recommended to sample well before seeding, to allow time for:
- soil analysis
- reporting
- planning fertiliser requirements
- ordering and delivery of fertiliser.
Selecting areas for sampling
Soils are tested for many reasons and there is no single rule for determining which areas should be sampled.
When seeking a total farm fertiliser program it is often best to sample every paddock on your property, but this can be both time-consuming and costly.
An alternative method is to select paddocks or sections of paddocks that represent the major range of conditions present, for example:
- good — poor pasture
- high — low stocking rate
- flats — slopes
- black — red soil
- sandy — clay soil
- granite — basalt.
In subsequent years, different areas can be sampled and the results combined to provide a profile of the entire property.
Sometimes soil testing is used to investigate specific problems. In these cases, it is often helpful to contrast the situation by taking a sample from a non-problem area as well — for example, good and poor sections of a paddock.
General sampling guidelines
1. Part or whole Paddock sampling.
Take 30 cores from at least 30 sites evenly distributed over the paddock or section of paddock.
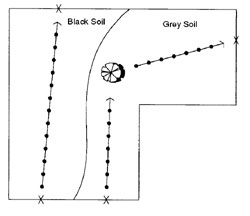
Grid patterns (Figures 1 and 2) or transect lines (Figure 3) (mark fence posts, use tree, dam etc) can be used to best suit the area to be sampled. It is important to mark the sampling pattern, so future testing can be compared with previous analysis.
Figure 1. Recommended sampling sites for areas less than 20 ha (50ac) — regular shaped paddock:
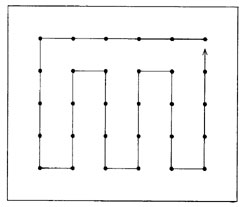
Figure 2. Recommended sampling sites for areas less than 20 ha (50 ac) — irregular shaped paddocks:
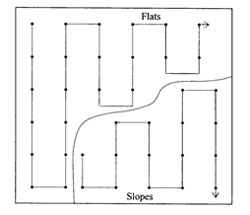
Figure 3. Recommended sampling sites for areas greater than 20 ha (50ac) — regular shaped paddocks:
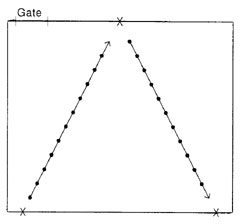
Figure 4. Recommended sampling sites for areas greater than 20 ha (50ac) — irregular shaped paddocks:
2. Cores should be taken from spots of average growth or poorer spots if they are numerous. Bare ground should only be sampled if that constitutes a significant part of the paddock.
Remember that you are trying to get an 'average' sample that is representative of the entire area. Avoid patches of:
- very good growth
- obvious dung or urine patches
- stock camps
- stock tracks
- fertiliser dump sites
- recently grazed strips
- or where hay or lucerne are stored.
It is best not to sample within 10m (30ft) of:
- fence lines
- gates
- troughs
- trees.
Fertiliser takes a little while to be incorporated into soil. It is best not to sample soils which have been fertilised or limed within the past six weeks.
3. When taking cores, growing plant material should be avoided by inserting the sampler tip between leaves and stems. It is important not to remove any soil or dead plant litter from the surface before taking the core.
- Take the cores to a depth of 10cm (4in).
- Remove each core carefully from the sampler using a clean screwdriver or similar tool.
- Place the core in a clean plastic sample bag or other suitable container.
- If only part of the core comes out with the sampler, discard that core and re-take the sample.
4. At least 30 cores should be taken from the area being sampled. The more cores that are taken, the more representative the sample will be. It is particularly important to collect as many cores as possible in small, intensively grazed and regularly fertilised paddocks — such as dairy pastures and house paddocks.
5. If you have more than the amount of sample required by the laboratory, it will be necessary to sub-sample:
- place the sample in a clean container
- break up the clods
- spread the total sample evenly on a clean bench
- divide the sample into four quarters
- discard the two diagonal quarters
- place the remaining sample in a clean container.
6. Transfer the cores or the subsample to a clean sample bag if you have not already done so and seal the bag. Mark the bag with the paddock or section name, the number of cores taken and the depth of the sample. Sample hygiene and storage is very important. It is important that samples are not contaminated during sampling (for example, sunscreen on samplers' hands) and that samples are stored in a cool environment and sent to the laboratory within 48 hours of collection.
7. Your samples are now ready for dispatch to the laboratory. Provide all the information requested by the laboratory processing your samples to ensure that the best possible recommendations can be made.
Modifications to guidelines for sampling cultivated land or new pasture
When sampling cultivated land or new pasture, the soil may be 'fluffed-up'. Ensure that you obtain cores that are a full 10cm (4in) depth by firming the soil with your foot prior to sampling.
Guidelines for sampling subsoils
Sampling of subsurface soil may be required where:
- a deep-rooted species such as lucerne is being established
- deep-rooted plants are not growing well
Suspect subsoil nutrient issues:
- soil structural problems may exist
- better understand subsoil nutrient levels.
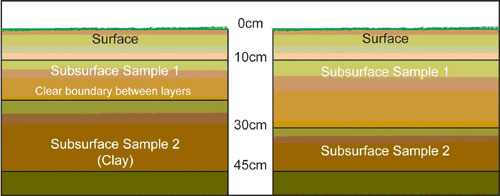
It is recommended that at least two subsoil depths are always sampled. Examples of the depths to sample are presented in Figure 5. Each composite sample should consist of soil cores from at least 15 sites evenly distributed across the paddock.
Where the depth to the clay layer in a soil varies, sample to the top of the clay layer and then sample the clay layer as a separate sample.
When collecting subsoil samples, be careful not to contaminate them with scrapings from other soil layers. Because the chemical properties of soils vary dramatically with depth, even minor contamination of subsoil samples can make the interpretation of chemical results very difficult.
Figure 5. Recommended subsoil sampling depths — soils showing a marked and soils showing a gradual change in colour or texture:
Additional information
- We recommend that soils are sent to a certified laboratory for analysis. A list of certified laboratories is available from the Australasian Soil and Plant Analysis Council (ASPAC).
- Contact us for more information on soil analyses and sampling.