Composting spoiled hay
At various times heavy rains and flooding have spoiled stored hay.
Options for recouping this investment are few and include using the bales to fill old gullies, spreading hay over the surface of paddocks and allowing pasture to grow through, or composting the spoiled hay. Of these options, composting has the greatest potential to return some benefit to the farm.
Aerobic composting is the rapid decomposition of organic materials into a humus-rich product ideally suited to soil improvement. High temperatures are naturally generated during the composting process resulting in the destruction of any weed seeds and pathogens that may be present in the raw organic materials.
If your farm produces sizeable quantities of 'waste' materials each year (spoiled hay, silage, manures), then composting is a good way of improving your soil and extracting extra value from what was previously often regarded as waste.
Compost contains valuable nutrients and is rich in humus. Humus is long-lasting in the soil and can be beneficial in providing for improved physical, chemical and biological conditions.
Composting methods
While there are numerous composting methods available, the most simple and cost effective for farmers is the 'Turned Windrow' method.
This involves piling organic materials in correct proportions and with adequate moisture, in rows on a suitable surface and then mixing well. The dimensions of the windrow depend on:
- types of materials being composted
- space available
- equipment being used.
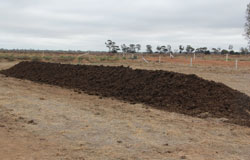
For a manure-based operation, the height of the windrow will be typically around 1.5 m, with the base at 2 to 3 metres wide. The length of the row can be as long as space permits (Figure 1).
Many farm wastes (manure, hay, silage, sawdust) can be composted with minimal pre-treatment. Other wastes that become available from time to time (woody wastes) may need to be chopped up because they are too coarse.
Once the wastes are correctly mixed in the right proportions, and at the right moisture content — the composting process will begin. Composting is a biological process, carried out by microorganisms that are naturally present in the environment — so no special inoculants are required. All you need to do is provide organic materials in the right proportions, with moisture, and the microbes will do the rest.
Understanding the conditions required by the composting microbes is paramount to successful composting. Microorganisms have 3 basic needs and when these are provided the composting process will proceed and the mix will heat up. These needs are:
- oxygen
- adequate moisture
- suitable food supply.
Oxygen
Fresh air contains 21 per cent oxygen but inside the composting pile microbes will be actively consuming oxygen.
Oxygen percentages of greater than 10 per cent inside the pile are adequate but when levels drop to around 5 per cent, the activity of the microbes will slow. In oxygen-deprived piles, anaerobic microbes will begin to dominate and unlike the aerobic microbes, these can produce foul smells.
Aeration is maintained by physically turning the pile, and also ensuring that the feedstock contains a mix of small particles and larger air trapping particles. Wastes such as manure can have high moisture contents, and if not well-mixed can impede air flow. Such material should be mixed with structured wastes such as straw or woodchips.
Water logging of the pile (from rain), over watering or poor structure can create an oxygen poor environment — so moisture levels need to be monitored.
Moisture
Just like all living creatures, composting microbes need adequate moisture to survive and the ideal moisture content is around 50 to 60 per cent. This is to say that, if 100g of compost were oven dried, there would only be 40 to 50 grams of dry matter remaining.
Another way of determining the moisture content of your compost is to assess it by hand. Ideally compost should appear wet, but when a handful is taken and squeezed hard, moisture should be visible but not run out of your hand. At 50 to 60 per cent moisture content, the compost will hold its form after squeezing, and resist crumbling (Figure 2).
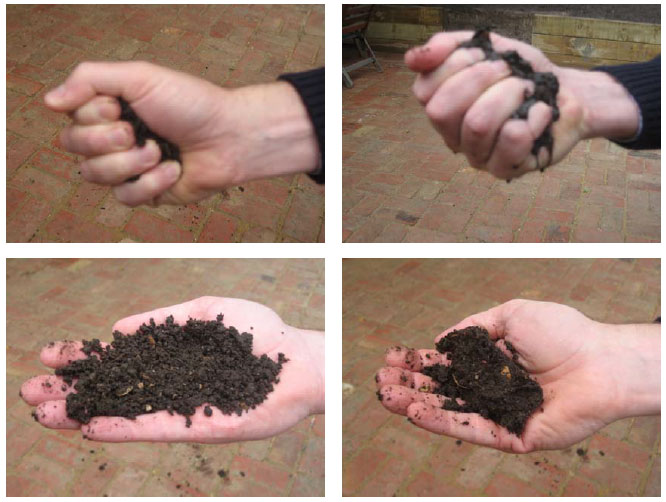
If the compost is too dry (below 30 per cent moisture content) microbial activity will be restricted, and if it's too wet (greater than 60 per cent) conditions will become anaerobic and unfavourable microbes will flourish, creating nasty smells.
Adequate moisture levels should be established when the mixture is first created. As the microbes consume the compost materials they will generate heat, causing water to evaporate from the pile. This is a beneficial process as it moderates the temperature of the pile — it is important that this moisture is replenished. Moisture content should be assessed at every turning, and additional water applied using a hand-held or soaker hose as required.
Stockpiled spoiled hay is often very dry and can be difficult to re-wet. Trying to wet the hay at the same time as mixing it with manures can be very difficult. It is best to spread out the hay, some time in advance of making the pile, using a bale processor where the row is to be established and allowing time for rain to thoroughly wet the hay. Alternatively, a soaker hose that slowly applies water will do the job.
C:N ratio and nutrients
The carbon to nitrogen ratio of the compost feedstock will have important implications on the speed of the composting process. Think of the nitrogen as fuel needed by microbes to tackle the task of breaking down carbon.
If there is too much nitrogen, the pile may heat up too quickly and loss of nitrogen in the form of ammonia can occur. If there is too little nitrogen, the pile may not heat up enough and the compost may take much longer to break down.
Ideally we want to have a carbon to nitrogen (C:N) ratio of about 30:1 when we start — 30 parts of carbon by weight to one part of nitrogen. In practice, an initial C:N ratio of between 25 to 40:1 is usually quite sufficient. This will gradually fall to 10 to 20:1 as the carbon in the pile is digested.
Other nutrients are also needed by the microbes in addition to carbon and nitrogen. These include:
- sulphur
- phosphorus
- other trace elements.
If animal manures are a primary ingredient of the compost, then these elements are usually in plentiful supply.
A variety of pH levels are conducive to composting. At a pH above 9 emissions of ammonia production may present a problem. This is unlikely to be an issue if normal organic ingredients are used.
Temperature
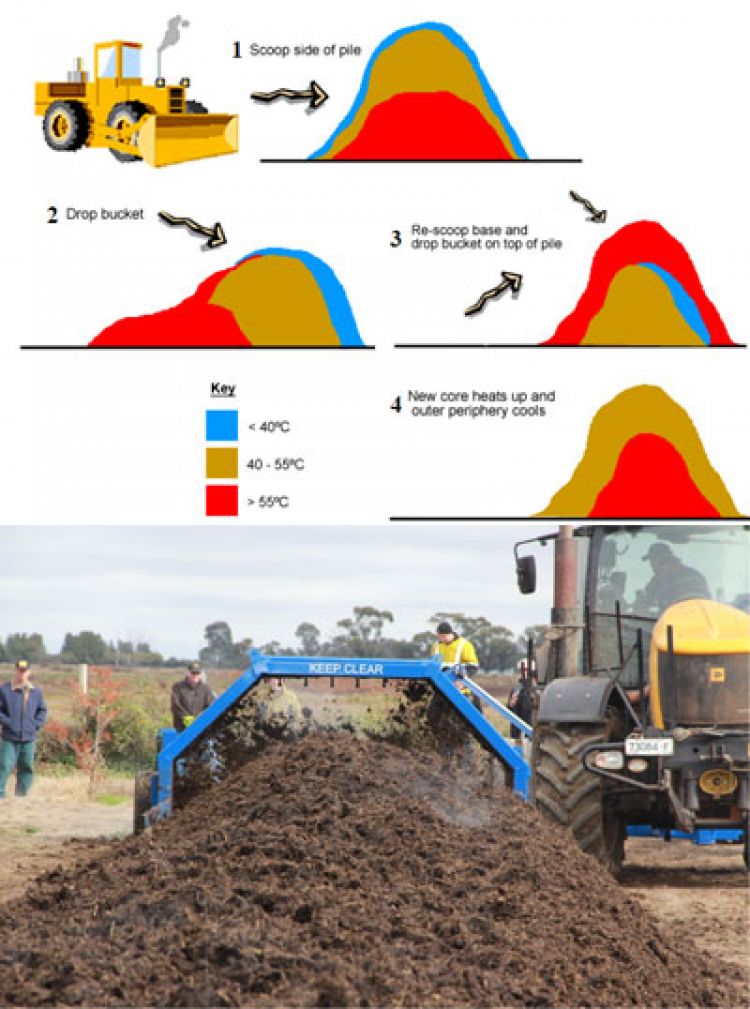
Heat is naturally generated by microbes as they digest waste materials. This heat will build up within the piles, with the highest temperatures occurring in the centre. The ideal range for effective composting is between 45 to 65˚C, and to maintain temperatures within this range the pile should be monitored and turned or watered as necessary.
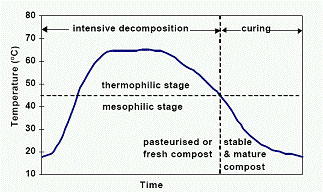
Temperature can also be used as an indicator of how the composting process is progressing. The early stages will see the temperature climb quickly — assuming the pile has been properly constructed. Heating occurs due to the rapid increase in biological activity in the pile and the consumption of available food by the microbes.
During this early phase (week 1 to week 2) the pile will need the most attention to prevent over-heating. Careful monitoring of temperature is necessary to know when to turn a pile. The temperature should not be allowed to go beyond 70˚C. Once 65˚C is reached, the pile should be turned to blend cooler material from the outside to the inside, ensuring evenness of the final product.
During this process, care should be taken to assess the moisture content of the material as discussed below. If the material is too dry or has dry sections, moisture must be added for proper composting to continue. Once reformed, the pile will again heat up. Temperature monitoring will provide the feedback necessary to know when to next turn the pile.
As time goes by, the pile will heat up less quickly and after the first couple of weeks, will no longer achieve 65˚C. This occurs when the easily digestible feedstocks are depleted and microbial activity declines. Once temperatures fall below 45˚C, fungi become progressively more important, particularly in the latter stages of decomposition, due to their superior ability to degrade more complex organic compounds such as lignin and lignocelluloses. When the compost reaches near ambient temperature, and turning does not result in significant changes in temperature, the composting process is complete (see Figure 3).
There are 4 stages:
- mesophillic
- thermophillic
- pasteurised or fresh compost
- stable and mature compost.
Heat is an important consideration in ensuring that your compost has been rid of any pathogens or weed seeds. In order to be confident that the compost is pasteurised the whole mass needs to have reached temperatures higher than 55˚C for at least 3 days. This means that the pile must reach a minimum of 55˚C following 5 turns so that every part of the compost has been subject to high temperatures.
Mixing the feedstock
Compost ingredients must be thoroughly mixed to ensure effective composting. How well the compost is blended in the mixing process will strongly influence how rapidly the composting occurs as well as the quality of the final product. It will also make management of the pile easier and ensure the product is of a consistent quality.
Feedstocks can be mixed in a concrete bunker or during windrow formation. A mixer wagon could be used for mixing compost materials but care should be taken when manure is used in a mixer wagon that is also used for mixing feed rations. Sterilisation of mixer wagons is recommended prior to re-using the wagon to mix feed.
The coarseness or fineness of the feedstock will influence how aerated the pile will be. A balance is needed between fine particles — which contribute large reactive surface areas — and larger particles — that contribute structure and support good air movement into and out of the pile.
Every effort should be made to keep out plastic, metal pieces and other rubbish since these can be difficult to remove once introduced and will reduce the quality of the final compost.
Selecting a site
Site selection is a pivotal factor influencing the success of a composting operation. Ideally, composting should be conducted on a level, compacted surface. Suitable surfaces include concrete, crushed rock or gravel and compacted soil.
Other considerations include:
- distance from composting site to the paddock
- access to compost ingredients and water
- avoiding potential odour complaints
- wind direction
- distance from surface water
- proximity to ground water
- slope
- runoff storage.
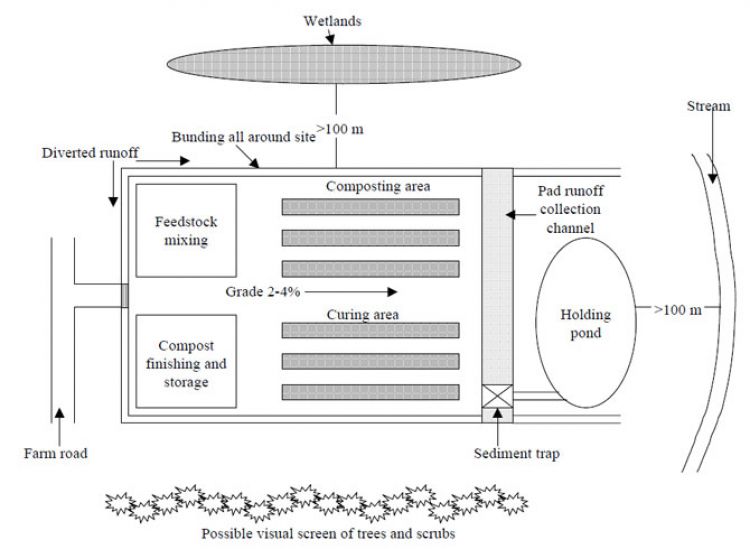
Figure 4 shows a well designed site that has distinct functional areas for each phase of the compost preparation.
Monitoring and turning
Monitoring the pile with a compost thermometer will provide you with the information you need to make turning decisions. If temperatures start to fall below 45˚C in the first 2 to 3 weeks the pile should be turned to replenish oxygen and expose new material to microbial decomposition. When temperatures reach 65˚C the pile should be turned to prevent over-heating, and to maintain an efficient composting process.
Additionally, turning the pile will ensure that all of the compost is exposed to high temperatures in the centre of the pile to kill pathogens and weed seeds, and make sure that the final product is homogeneous.
As well as informing management decisions such as when to turn and water, monitoring also provides an insight into how the compost is progressing and when it has reached completion, as indicated by temperatures approaching ambient.
The pile can be turned with a front-end loader, or a specialised windrow turner and both have advantages and disadvantages.
The advantages of a front-end loader is that most farmers have one and with a little practice, they can be quite efficient at turning the compost.
The disadvantage of a front-end loader is the extra time needed to complete the task compared to a specialised compost turner.
Specialised compost turners are quick and highly efficient but they are expensive (starting around $50k) and also require a tractor with sufficient horsepower, a PTO and creeper gear.
Front-end loaders are excellent for getting started to see if composting is right for your farm. In some parts of Victoria, contractors provide turning services for farmers at affordable rates, making the process of compost-making a lot easier.
Curing and storage
When temperatures in the compost are within 10°C of ambient, and turning no longer results in a rise in temperature, the compost may be ready for use. However, it will benefit further from a short (3 to 6 weeks) period of curing. Curing reduces the likelihood of experiencing plant toxicity effects that can sometime occur with the application of fresh compost. Curing also promotes the formation of stable and complex humus compounds. During the curing phase the compost will not require turning.
Stable compost can be stored for longer periods.
Care should be taken not to contaminate stable, finished compost with potential pathogens and weed seeds that can be transmitted on equipment. Care should also be taken to prevent the pile becoming saturated or flooded.
Application
Annual crops
For annual crops, apply compost before sowing — ideally 2 months ahead. This allows the compost to become integrated into the soil to start soil conditioning and biological stimulation. Ideally compost should be incorporated or at least 'tickled' into the surface soil.
Perennial pastures
For perennial pastures, paddocks should be grazed down before compost is applied. This enhances contact with the soil surface and pasture re-growth will quickly shade the compost and prevent it drying out or blowing away. Compost can also be surface applied under perennial crops (trees, shrubs and vines) where it will slowly decompose or be drawn into the soil by the action of worms and other invertebrates.
Application rates
Application rates should not exceed 60m3 per hectare per year on high value crops. Higher rates will be uneconomical and can result in nutrient losses in the same way that inorganic nutrients can be lost if over-applied. Broadcasting compost is the easiest way to improve soil conditions across a whole paddock. Restricting application to planting beds, placement in trenches or banding can be used to reduce total application requirements and costs.
In practical terms, application rates for perennial pastures or cropping are likely to be in the order of 1 to 7 tonnes per hectare per year. The cost of this is highly dependent on the degree to which farmers have:
- access to compost material
- labour costs
- machinery costs.
As a general guide, farmers report costs in the order of $100 to $250 to make and spread 3 tonnes of compost per hectare.
Getting started
Until you develop a 'brown' thumb, it can be difficult to determine if you have a starting C:N ratio between 25 to 40:1, particularly when blending materials as different as cow manure and hay.
Nitrogen levels
In addition, different manures have different nitrogen levels. For example, chicken manure has the highest available nitrogen of commonly available manures. If compost is to be made with spoiled hay and chicken manure, less chicken manure would be required for the same quantity of hay than if cow manure was used.
Age of manure
The age of the manure is also a consideration. Stockpiled manure can start composting as microbes consume available nitrogen and carbon. Even wet hay will generate some heat for a short time until available nitrogen is exhausted. In general, the fresher the manure, the more nitrogen will be available for the composting process. Older manures may still be suitable — just more will be required to achieve the 25 to 40:1 starting C:N ratio.
Test pile
Prior to large scale composting, it is essential to develop a test pile. This will provide valuable information before you invest a lot of time and effort in building a large compost pile or windrow.
The test pile should be a minimum of 1.5m tall and 2 to 3m wide at the base. Smaller piles may not have the mass to properly heat up or can lose heat too quickly.
As a general rule when composting cow manure and spoiled hay, add them at a ratio of one part of cow manure to 0.8 to 1 part of spoiled hay by weight. If using chicken manure, rates of 0.5 to 0.7 chicken manure to 1 part of spoiled hay by weight can be used as a starting guide.
It must be understood that these figures are rough guides to be used in the absence of laboratory analysis of the materials.
Mix the ingredients in the suggested quantities with adequate moisture and leave the pile for 2 or 3 days. After this time, use a compost thermometer, hay probe or other device that will give you a reliable measure of the temperature. At this time the pile should be heating up just like a larger pile would. If it does not heat up, check for adequate air and water. If these are adequate, more nitrogen-rich (manure) materials may be required.
Monitor the temperature every 2 or 3 days and use this information to indicate when to turn the pile. Once you are happy that the small pile is progressing well, you can expand the scale of operations to make windrows as long as you like. The principles are the same, allowing scaling up of operations as required.
Keep a written record
Developing your 'brown' thumb will be helped if you maintain a detailed written record of what you have done (ingredients, proportions, moisture content, weather conditions) together with a record of pile temperatures, dates turned, additional moisture added and visual observations of what is going on in the pile.
This allows you to learn from your mistakes and more rapidly develop your compost-making skills.
Further information
Further information on composting: