Monitoring groundcover and soil degradation
Groundcover monitoring tools can help farmers and advisers in southern Australia to measure goundcover on farms. Managing groundcover can ensure that soils don't become susceptible to degradation caused by erosion from wind and water.
The tools allow farmers to assess the current groundcover conditions using different techniques, including:
- visual assessment (Tool A)
- field assessment — wire and step point method (Tool B)
You can decide to use just one of the tools or both, depending on how you prefer to monitor and how much time you have.
Groundcover assessments are seasonably variable. Monitor and record your assessments regularly throughout the year to get a more accurate result.
What is groundcover?
Groundcover is the percentage amount of plant material (dead or alive) that covers the soil surface. 100% groundcover means that the soil cannot be seen and 0% groundcover is bare soil.
In most landscapes there is usually some form of groundcover on the soil surface. Farming systems have groundcover in the form of annual or perennial pastures or crops. Native vegetation areas will also benefit from groundcover assessments, though management of these areas is quite different to managing introduced species.
Weeds can be a form of groundcover but they can negatively affect production and also raise environmental concerns.
Reduction of groundcover
Groundcover may be reduced through:
- overgrazing
- times of drought
- cropping
- tilling
- poor seed establishment
- chemical removal
- excessive trafficking
Management techniques
To avoid overgrazing, stocking rates should be calculated on the amount of available dry matter per head of stock.
Crops need to be managed so that groundcover is provided throughout the year, as intense rain and wind events can lead to erosion and degraded soil structure if crop cover is burned or buried. The management option of stubble retention and minimal tillage are the best ways to ensure maximum groundcover retention, more efficient water use and greatest control of erosion.
Tool A: Visual assessment of groundcover
Goal: To maintain groundcover at a minimum of 70% to prevent soil erosion from wind and water. Groundcover includes both living and dead plant material and litter.
1. Select areas to monitor
Think about what you're trying to achieve by monitoring groundcover. For example, is it to:
- rehabilitate a known degraded area
- assess pasture cover for potential increases in animal carrying capacity
- assess the groundcover of the entire property to assess your risk of soil erosion
Whatever the reason, it's important to record the areas monitored, stating specifically where the assessments were taken and, if possible, marking the areas on a farm map. This will allow you to assess groundcover over time.
2. Decide the time of year when groundcover is at its lowest level
Groundcover is seasonably variable, so it's important to take into consideration the times of the year that the monitoring has taken place. In some cases it may be advantageous to monitor twice a year, again recording the dates in which the assessments have occurred.
In southern Australia groundcover is often at its lowest level prior to the autumn break and therefore this is the best time to assess the risk of soil loss through erosion.
3. Choose a representative area

When monitoring it's important to make sure that the areas being assessed are representative of the entire area, so it is a good idea to take a few assessments in the one area to make sure that you are not unknowingly creating a biased assessment.
The best way to achieve this is to either:
- walk along an imaginary transect line, diagonally across the paddock from post to post (Figure 1)
- take 10 steps in one direction then randomly turn and take 10 steps in the other direction (Figure 2)
") The larger the area, the more assessments you need to take. Once you have had a quick walk over the general area, you'll begin to understand how variable the groundcover is. If an area seems quite uniform, then perhaps 8 to 10 assessments will give you a good indication of the average groundcover. In areas of high variability, take at least 15 or more assessments (depending on the size of the paddock or area).
The larger the area, the more assessments you need to take. Once you have had a quick walk over the general area, you'll begin to understand how variable the groundcover is. If an area seems quite uniform, then perhaps 8 to 10 assessments will give you a good indication of the average groundcover. In areas of high variability, take at least 15 or more assessments (depending on the size of the paddock or area).
Draw your transect roughly on a piece of paper and note approximately where the assessments were taken. Using a GPS (Global Positioning System) to reference each sampling site will add rigour to the monitoring.
4. Estimate the groundcover
Make a 30cm by 30cm quadrat (square) out of sturdy cardboard or wire. A quadrat is used to help focus the eye on a defined area for assessment.
Along the predetermined transect line, throw the quadrats out at random and visually assess the groundcover in the quadrant, comparing it with the following photo standards. Record your assessments in the provided Tool A pro forma for recording groundcover.
Download Pro forma 1 — Tool A recording groundcover assessments ![]() [MS Word Document - 15.1 KB].
[MS Word Document - 15.1 KB].


5. Take photographic records
You can take photographic records in conjunction with the visual assessment as a permanent reminder of what the pasture cover was like when being assessed.
Here are some tips for getting the most accurate photo records:
- Take the photos in the same spot each time. (Use the rough drawing that you created in step 3, and mark down at which points the photos were taken.)
- Make sure that the photos are taken approximately at the same times of the day (for example, between the lightest hours of 9am to 3pm).
- Always have the sun behind the camera when shooting.
- Check that the correct date is recorded in the camera, or write the date on a piece of paper and place it on the ground to be included in the photo.
- Take a few photos of the different ranges of cover.
- If your photos are digital, name and date the files. If they're printed, put them in an album or scrapbook and date each of the pictures.
Calculate average percentage of all assessments
Averaging the measurements in each area monitored will give you an overall percentage groundcover figure for that area. These can then be compared to other areas of the farm and priority can be made to the areas of low groundcover percentage in regard to on-ground works.
Add up all the percentages taken in the same area and divide that by the number of assessments taken in that area.
For example:
- add 5 samples taken in paddock 10B: 70%+ 90%+ 40% + 70% + 40% = 310%
- divide the total by the number of samples taken: 310/5 = 62%
Download Pro forma 2 — Tool A calculating average groundcover assessments ![]() [MS Word Document - 15.2 KB].
[MS Word Document - 15.2 KB].
Suggested minimum levels for groundcover
Different levels of minimum groundcover (and herbage mass can also be important) are needed for different soil types and regions. The suggested minimum levels for pastures in south-eastern Australia are:
- 70% for pastures on flat and slightly sloping (less than 3%) land and on non-erosion prone soils (moderate to good soils generally). Herbage mass should be a minimum of 800kg to 1200kg dry matter (DM)/ha.
- 80 to 90% groundcover for lighter, more erosion-prone soils. Minimum herbage mass should also be 1000kg to 1500kg DM/ha where land is undulating.
- 90 to 100% groundcover for steep hill country on light and erosion-prone soils (for example, slopes of greater than 10%, granite or light sedimentary soils with low fertility and often high acidity). Herbage mass should be a minimum of 1500kg DM/ha.
In areas such as the Mallee and Western Australia, 50% is often used as the minimum groundcover percentage. If you have less than the minimum groundcover percentages at the critical time, then your stocking rate is too high for sustainability.
Tool B: Field assessment — the wire or step point method
The first 2 steps of this method are the same as in Tool A: Visual assessment.
1. Select areas to monitor
Think about what you're trying to achieve by monitoring groundcover. For example, is it to:
- rehabilitate a known degraded area
- assess pasture cover for potential increases in animal carrying capacity
- assess the groundcover of the entire property to assess your risk of soil erosion
Whatever the reason, it's important to record the areas monitored, stating specifically where the assessments were taken and, if possible, marking the areas on a farm map. This will allow you to assess groundcover over time.
2. Decide the time of year when groundcover is at its lowest level
Groundcover is seasonably variable, so it's important to take into consideration the times of the year that the monitoring has taken place. In some cases it may be advantageous to monitor twice a year, again recording the dates in which the assessments have occurred.
In southern Australia groundcover is often at its lowest level prior to the autumn break and therefore this is the best time to assess the risk of soil loss through erosion.
3. Choose a representative area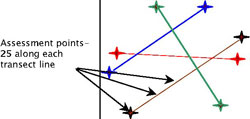
When monitoring it's important to make sure that the areas being assessed are representative of the entire area, therefore it is a good idea to take a few assessments in the one area to make sure that you are not unknowingly creating a biased assessment.
For the wire and step point method we recommend that you divide the area to be assessed into 4 line transects (use fences posts or trees to help guide your path along the transect) and sample 25 times at random along the transect.
4. Estimate the groundcover
You'll need a:
- painted white nail in the end of your boot
- straight piece of fencing wire that reaches approximately to your shoulder height, with one end of the wire bent to form a handle
To take the readings:
- Hold the wire by the handle at arm's length and shoulder height, with the tip straight down but not touching the ground.
- Look straight ahead along your transect line and take two or more steps along the line (the number of steps you can take will depend on how long the line is).
- Lower the point of the wire onto the ground, or if using the step point method, just take the steps and then look down to the tip of the nail in your boot.
- In the Tool B pro forma for recording groundcover, record the presence (yes) or absence (no) of surface cover directly under the point of the wire or at the tip of the nail.
- Repeat the steps until you have recorded 25 sample points along the transect.
Acknowledgements
Photographs by:
- Greg Lodge, NSW DPI (20% and 40% cover photographs)
- Primary Industries South Australia, 1996, Pasture Pics: easy estimation of pasture dry matter levels, Appila / Bundaleer Pasture Group, Appila, SA (50, 80 and 100% photographs)